Create Pull Request
Now you're ready to create and submit a pull request to have your changes or additions reviewed. Make sure to follow the Pull request guidelines.
-
Go to the main page of the repository.
-
Above the list of files, in the yellow banner, click Compare & pull request to create a pull request for the associated branch.
 important
All pull requests should be opened against the
mainbranch unless the it's for the upcoming next release. In that case, the PR should be opened against thedocs-stagingbranch. -
Provide additional information and if possible add reviewers.
A pull request must be related to a JIRA issue, unless the changes are minor, for example, correcting a typo. If it is related to a JIRA issue, reference the JIRA issue in the title.
A description that includes:
-
Links to the design files that you used
-
Relevant links to documentation outlining your work
-
A screenshot of a feature or fix you delivered
-
The following are extra but highly recommended:
-
A summary of changes and reasoning behind them
-
A TODO list of missing details on large pull requests
-
A list of open questions if there are any
-
(Optional) A video demonstration of the feature
-
For more details, see PR descriptions.
-
-
Select Create pull request.
If the pull request is a work in progress and not ready to be reviewed, select the Create draft pull request.
-
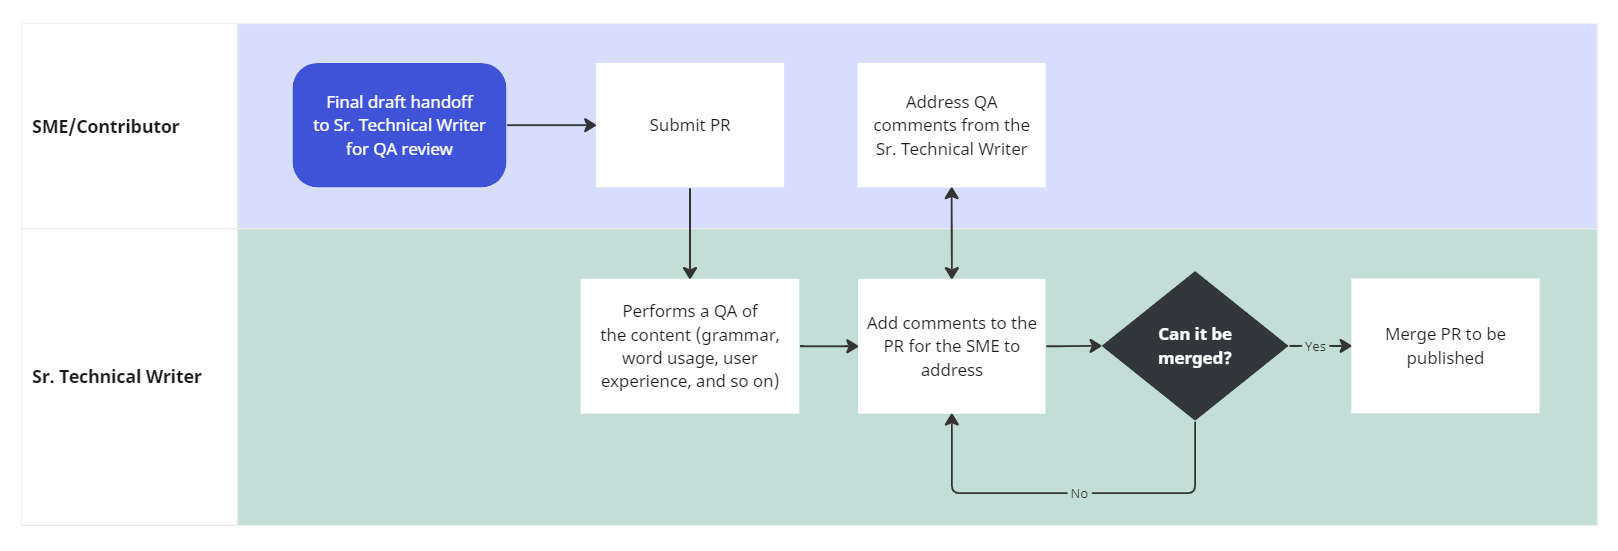
After going through the review process for technical accuracy and a copy edit from a Sr. Technical Writer, they will enter
#approvedand merge the pull request. Your changes get merged into themainbranch.
Pull request guidelines
We ask that contributors submit a pull request with your changes. Here are our expectations for pull requests. Following them will expedite the process of merging and publishing your content.
A few things to keep in mind when creating your pull request:
| If | Then |
|---|---|
| PR relates to issues you found in the docs | add inaccurate, typo or missing information keywords in the description and use the default base branch, main |
PR relates to GitHub issues you've addressed for customer-docs | provide links to related GitHub issues and use the default base branch, main |
| PR is part of the current release | use the default base branch, main |
| PR is part of the next future release | make it against the docs-staging branch |
| PR is part of front-end or back-end development | make it against the active-development branch |
Ownership
The ownership of the PR is on the person who creates the PR. The author's responsibility is to get it reviewed and approved for technical accuracy before submitting the PR.
Content dev process - High-level overview
Content dev process - Detailed breakdown

Pull request template
When you create a pull request, a default pull request template is automatically applied for all new pull requests in the repository. It's useful to ensure that every pull request follows a standard process and to have a to-do list for the author to check before requesting a review.
PR descriptions
The PR descriptions matter because it's an opportunity to set the reviewer up for a review they will know how to review. Here you'll get to explain what you've done, why're you've done it, and how to prove it is ready to be merged into the main branch.
| The What | The Why |
|---|---|
| Explain the changes you've made. It doesn't need to be fancy and you don't have to get too technical. At a high level, this is where you let the reviewer know the overall effect of the PR. It's important to explain what the change is and then reference the ticket. It's a much better experience for the reviewer if they're able to spend more time reviewing and less time studying speciications that may not even be applicable. Example "Added support for authentication. #JIRA-123" | The "why" is sometimes more important than the "what." The "why" tells us what business or engineering goal this change achieves. It's a chance to explain the engineering goal and the business. Example "These changes complete the user login and account creation experience." |