OneLogin
Beyond Identity phishing-resistant passwordless authentication for OneLogin
Beyond Identity and OneLogin integrate to offer phishing-resistant, passwordless login with device trust to OneLogin SSO.
This guide is designed to offer step-by-step instructions to integrate Beyond Identity with your OneLogin environment, and to enable your end users to authenticate with phishing resistant, passwordless authentication. Specifically, you will learn how to:
- Configure Beyond Identity as the primary phishing-resistant, passwordless authentication method for your OneLogin environment.
- Configure OneLogin to delegate authentication to Beyond Identity to enhance security and the user experience.
Prerequisites
To get started with the integration, view the following prerequisites.
OneLogin requirements
This information contains the necessary items for integrating with Beyond Identity.
- Appropriate OneLogin SKU (advanced or Pro) with provisioning and federation
- OneLogin Super User Privileges
- SCIM implementation for OneLogin as upstream directory source to Beyond Identity
- View the Generic SCIM for more information.
Beyond Identity requirements
The list below covers the basic Beyond Identity requirements for the integration.
- Secure Access Tenant with Super Admin Role
- Use an existing account, or sign up here to create a new Beyond Identity account
- Have at least two devices and two Super Admin roles configured*
- *Recommended, optional
For each of the platforms, have at least two administrators. Protect yourself from lockout and configure only one administrator at first with the integration. The administrator without the integration configuration can provide support if an access issue occurs during setup.
Steps
Follow the steps in the sections below to complete your integration for Beyond Identity and OneLogin.
Legend
The sections below use these two color codings to identify the steps for separate platforms.
🔵 Beyond Identity - Beyond Identity platform tasks are highlighted in blue.
🟠 OneLogin - OneLogin platform tasks are highlighted in orange.
🟠 Configure OneLogin Administration
These steps are for the 🟠 OneLogin platform administration account.
- Under the Authentication dropdown at the top, click Trusted IdPs.
- Click New Trust.
- In the blank field at the top for the Trusted IdP, type
Beyond Identity OIDC. - Click the green check icon to confirm.
- Click the checkbox for Enable Trusted IDP.
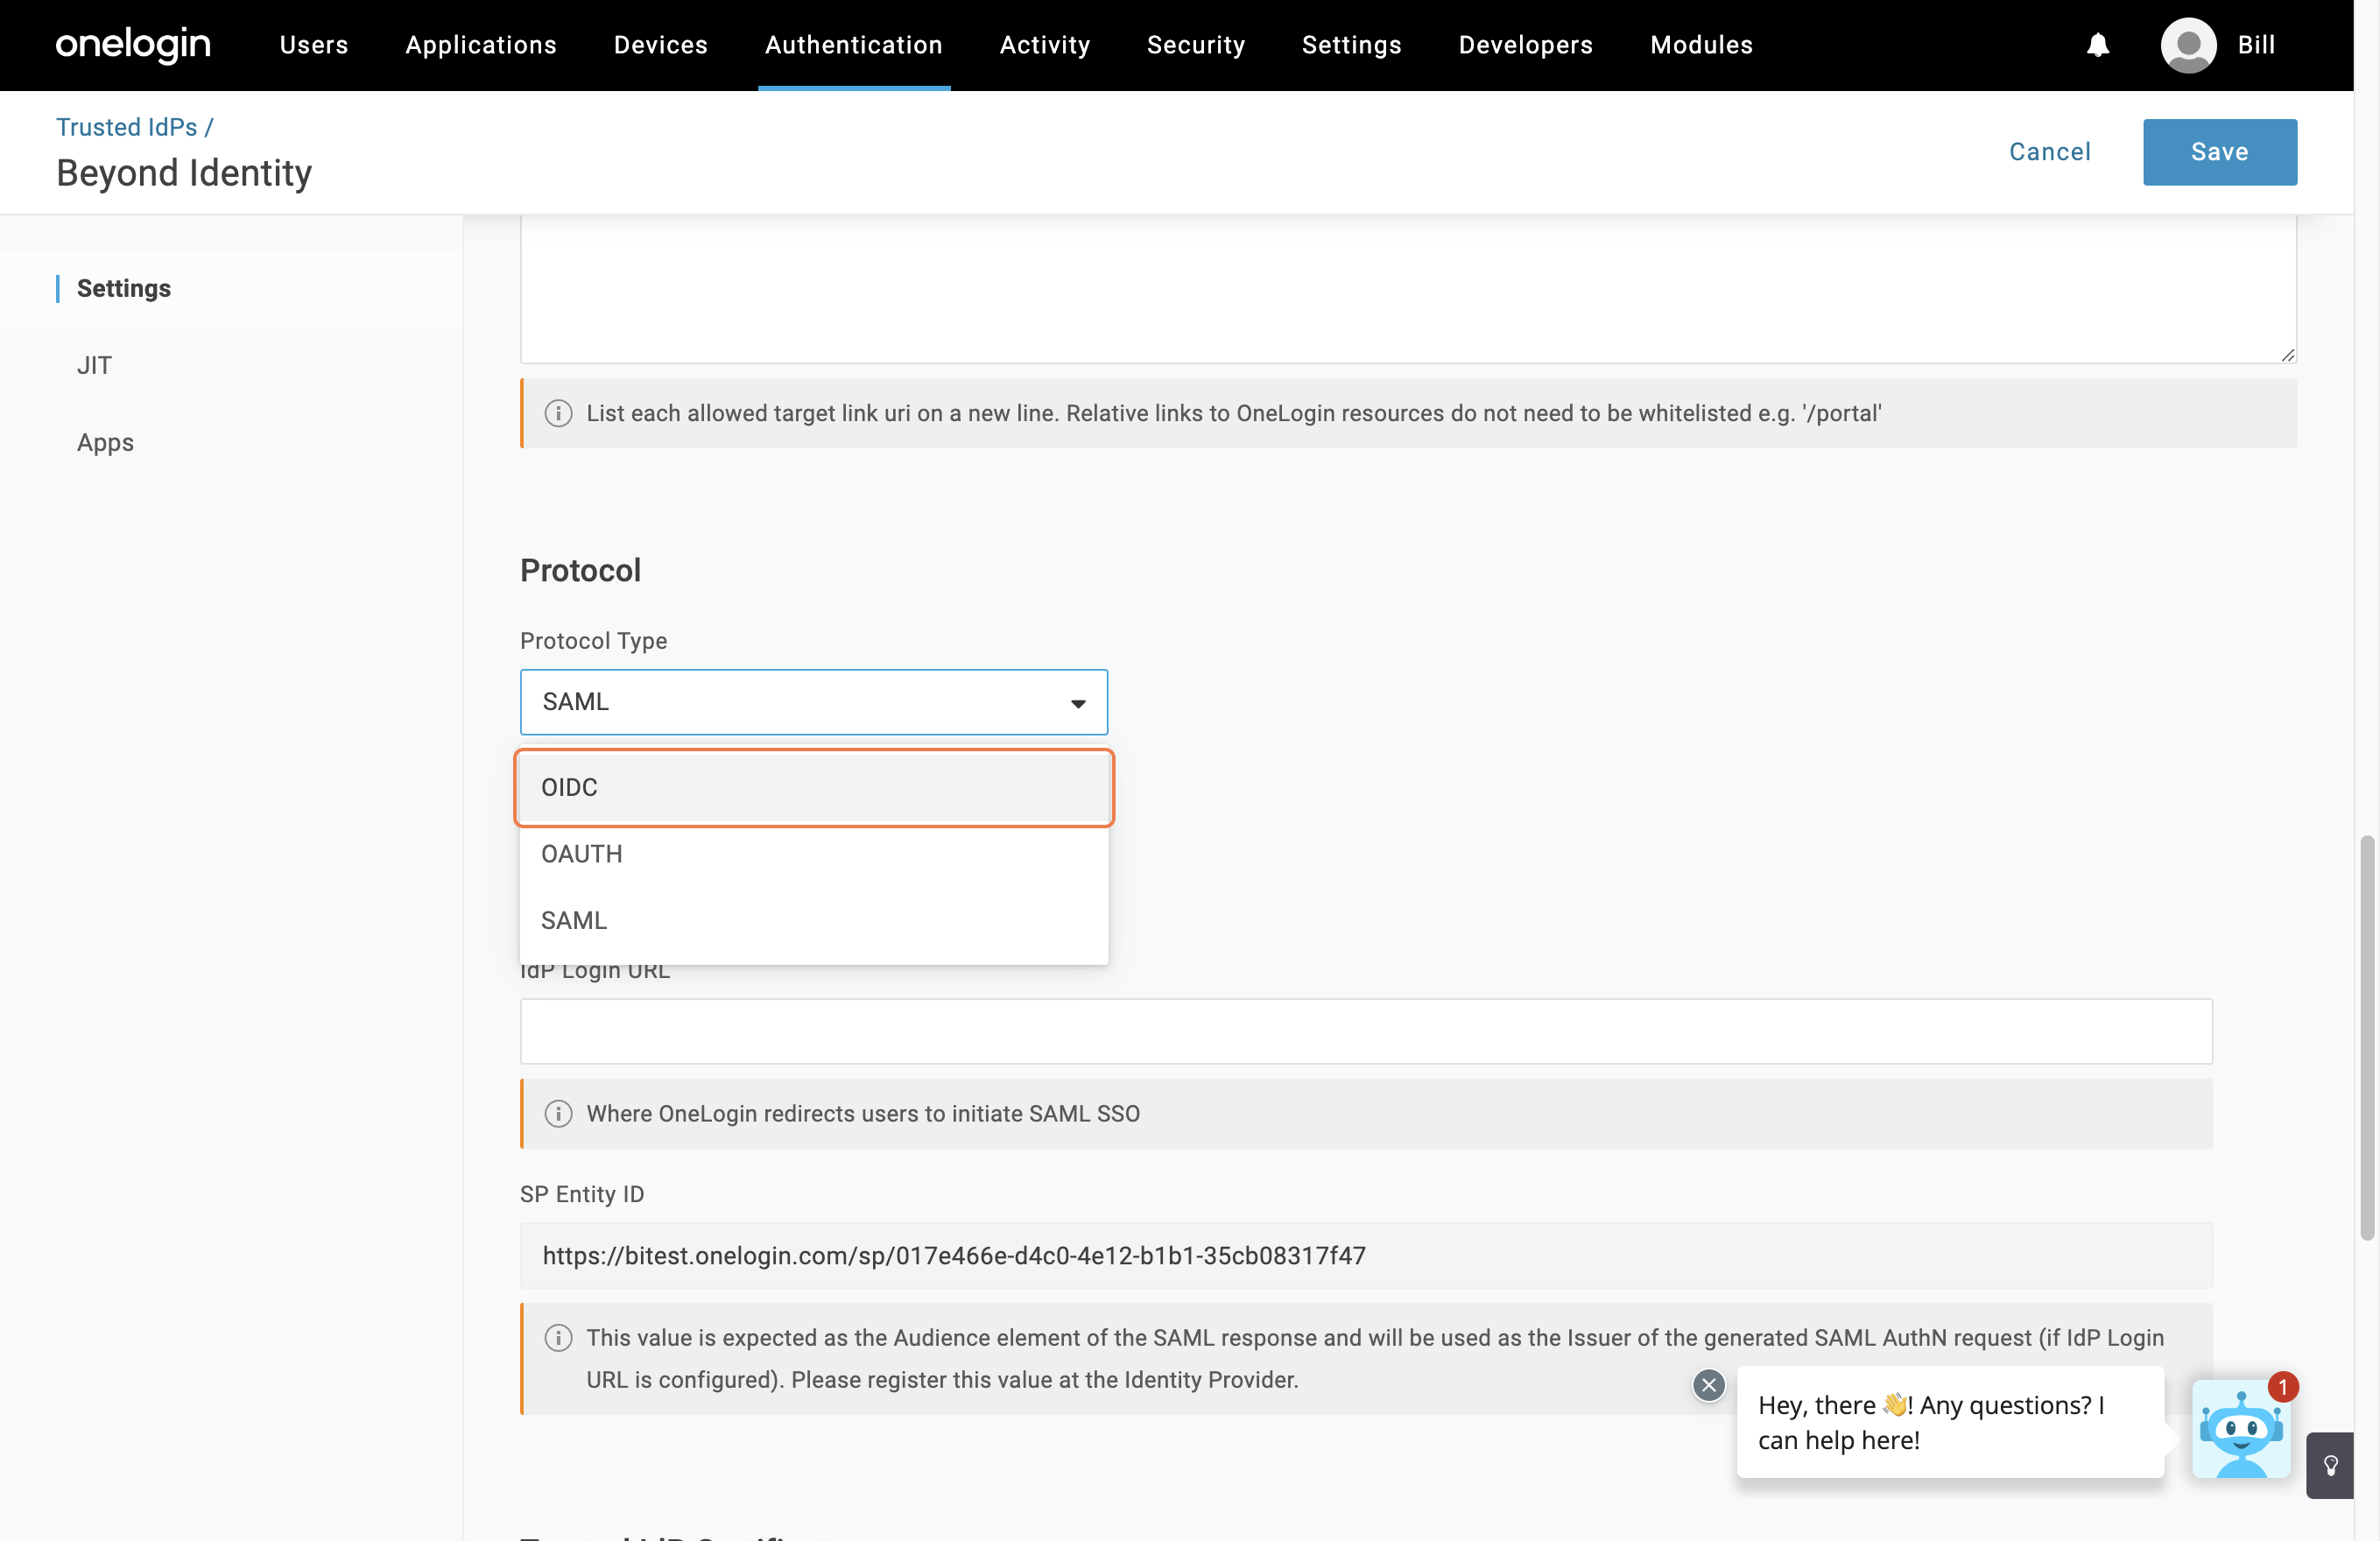
- In the same Settings tab, scroll down to the Protocol section.
- In the Configurations section, select the checkboxes for Sign users into OneLogin and Sign users into additional applications.
- Navigate to the Protocol Type dropdown and select OIDC.
🔵 Beyond Identity console information
The following section covers the 🔵 Beyond Identity console and related steps.
- Navigate to your Beyond Identity console.
- On the left-hand navigation under Access Control, click Applications.
- Select the Browse Applications tab.
- Click Generic OIDC to proceed.
- Click the Add OIDC button on the right to bring up the New SSO Application screen.
- Under Settings → General → Display Name, input
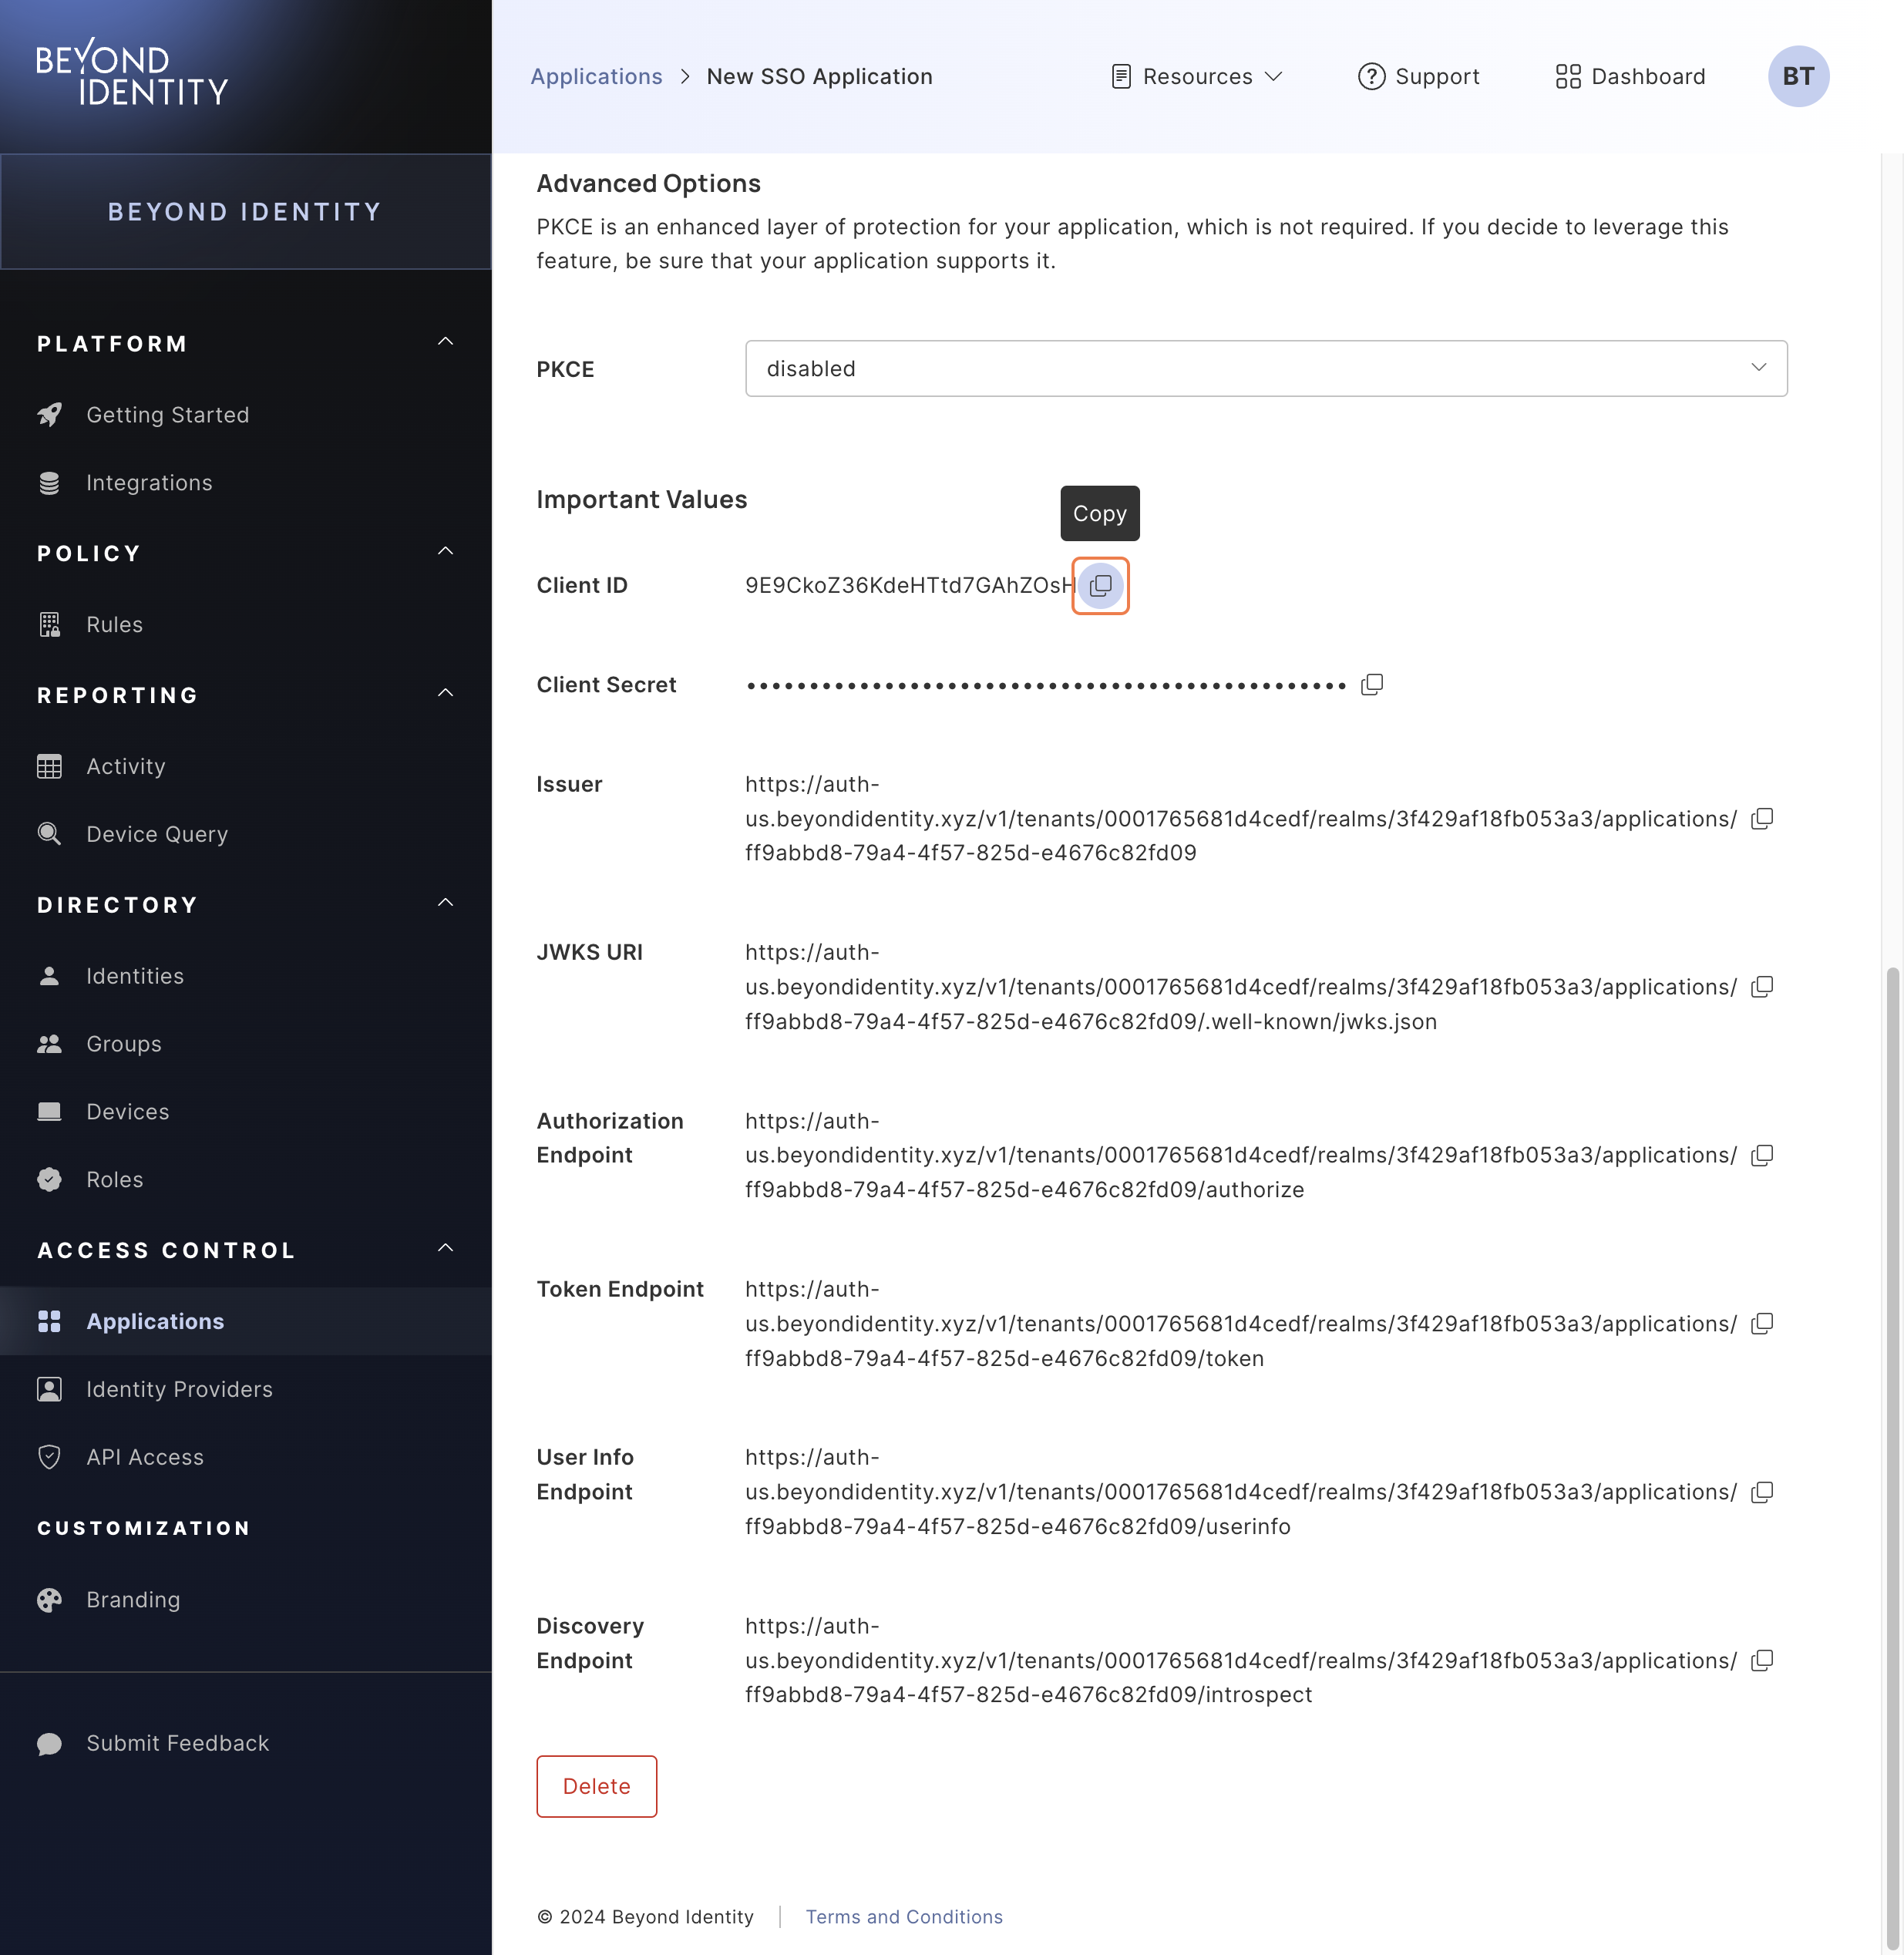
Onelogin OIDC Connectioninto the text field. - Scroll down to the Important Values section.
🔵🟠 Copy and paste values from Beyond Identity to OneLogin
This section explains the steps to copy values from Beyond Identity and paste into OneLogin. The color coding shows origin fields to destination fields.
- Copy the following values from Step 7 of the 🔵 Beyond Identity console information section. Navigate to the 🟠 OneLogin administration page to paste into the corresponding fields.
- 🔵 Issuer → 🟠 Issuer, under Configurations
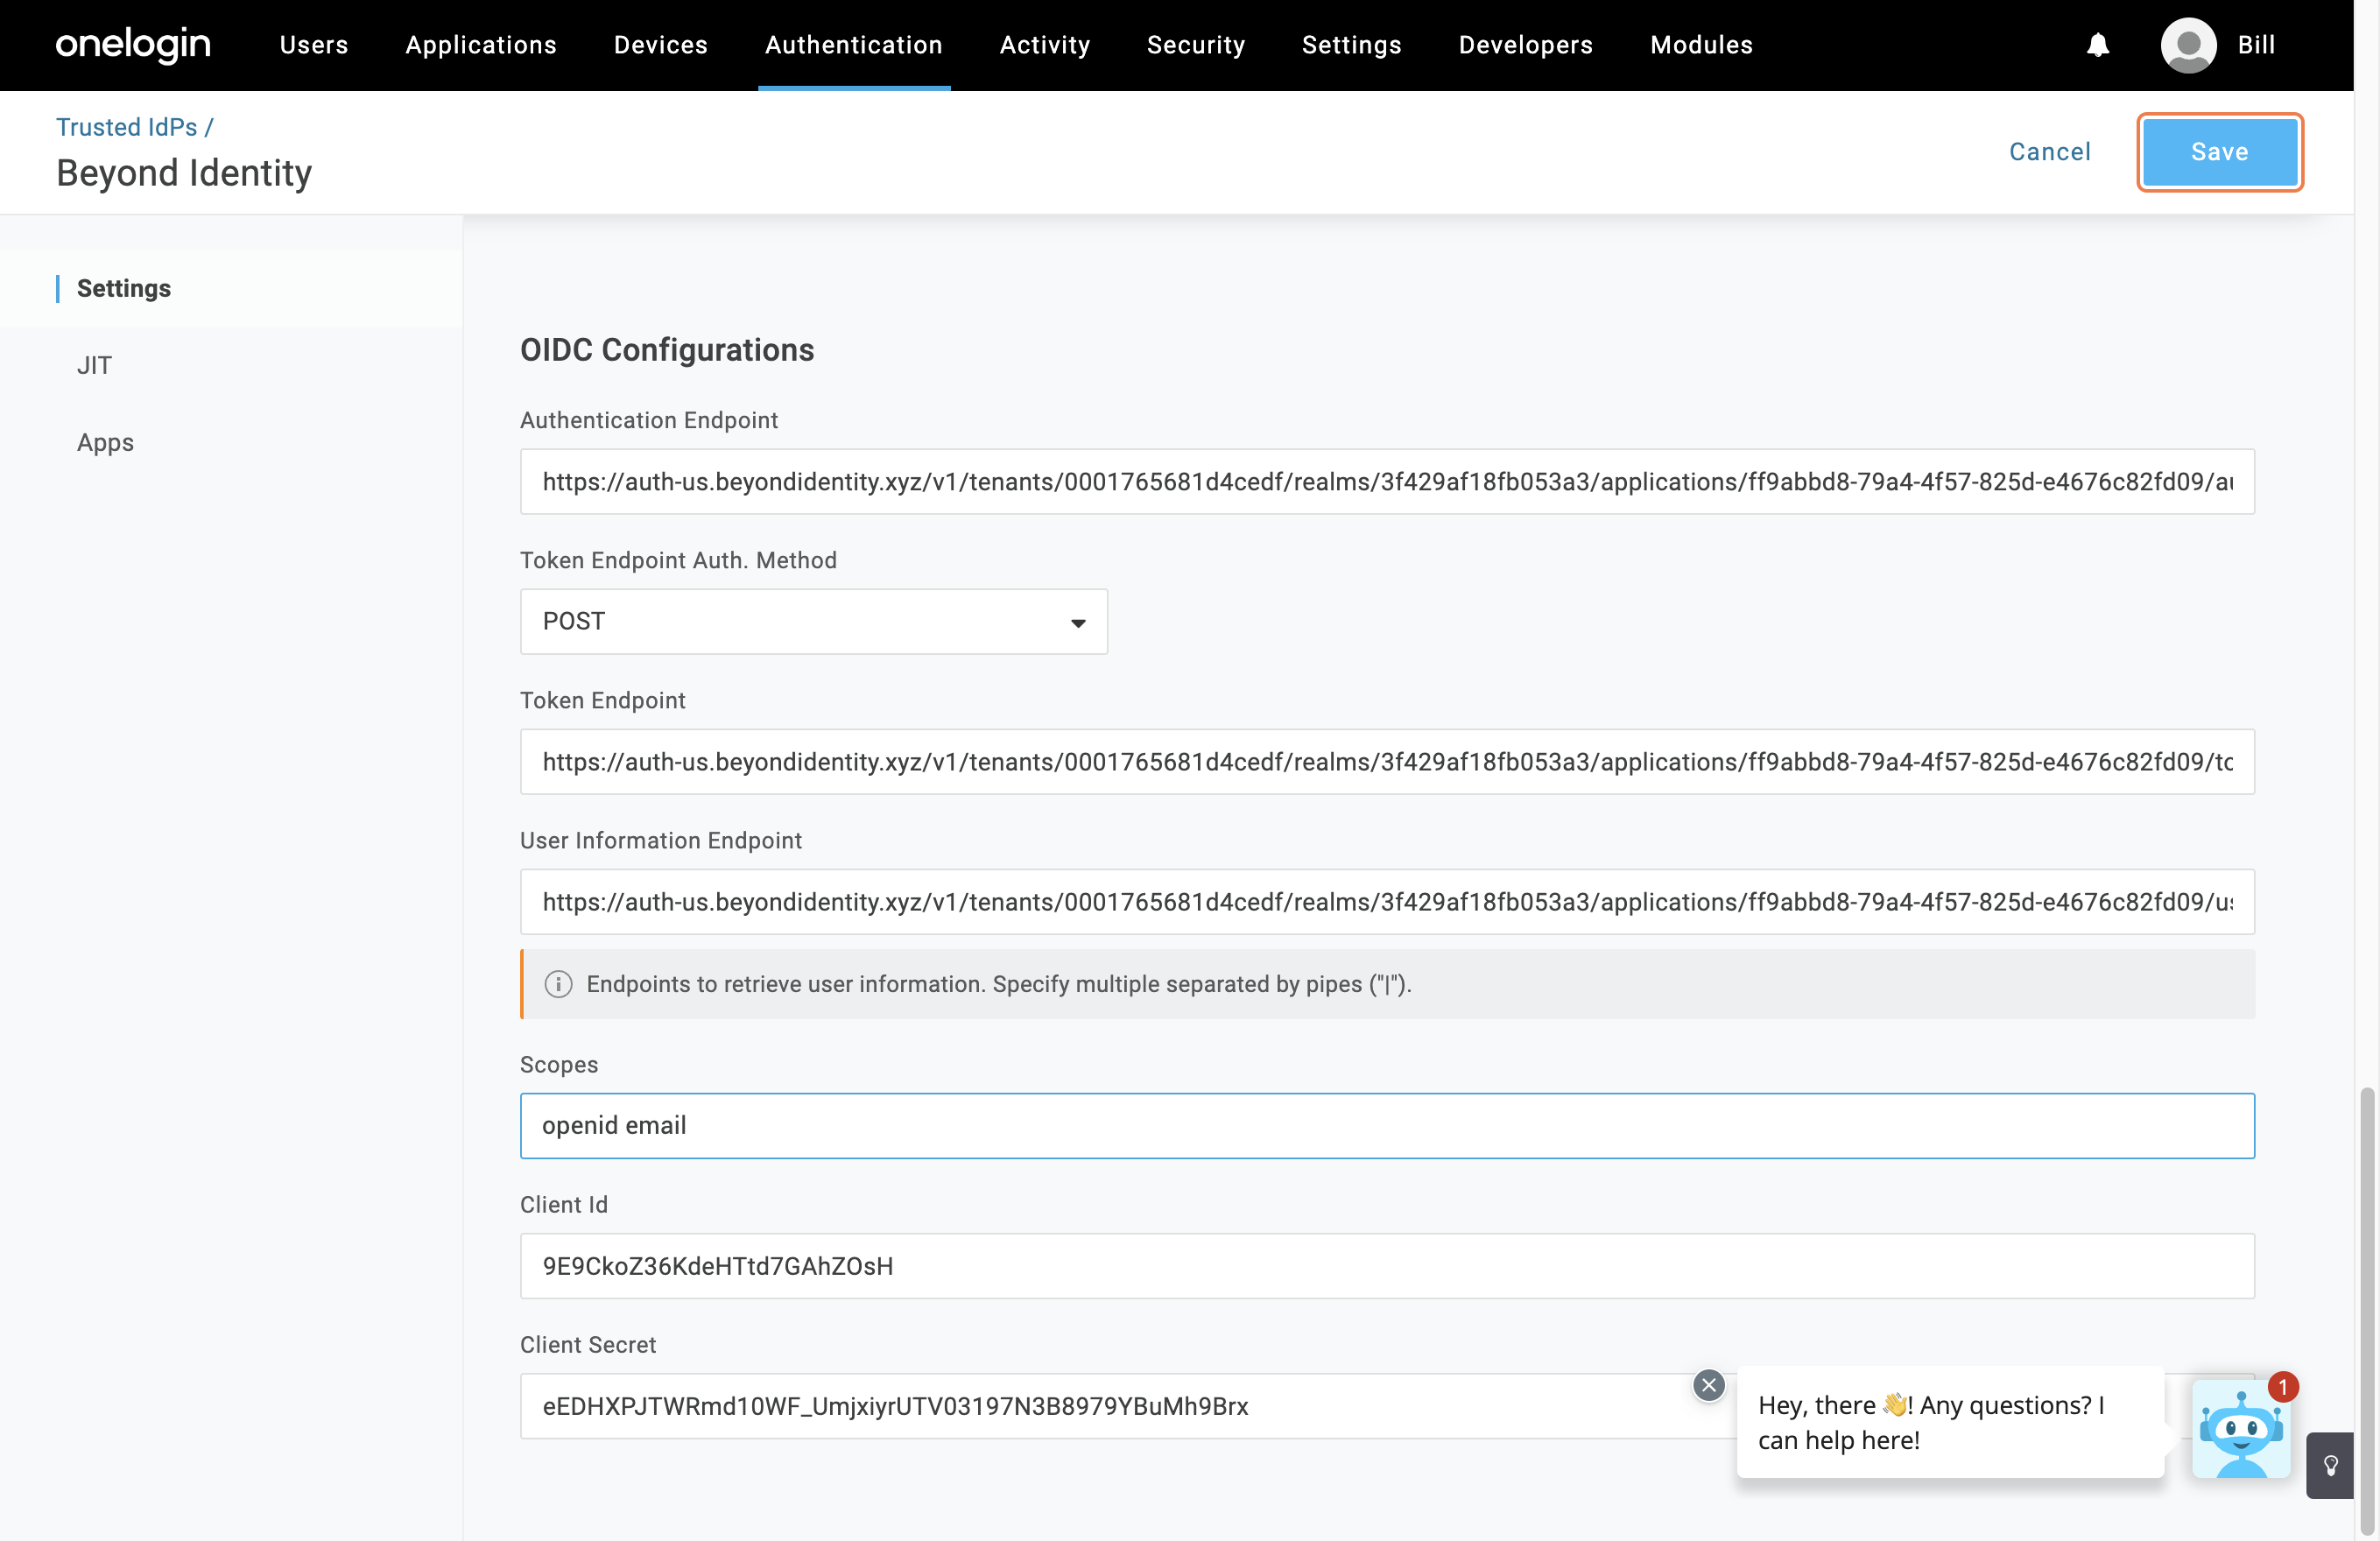
- 🔵 Authorization endpoint → 🟠 Authentication Endpoint, under OIDC Configurations
- 🔵 Token Endpoint → 🟠 Token Endpoint, under OIDC Configurations
- 🔵 User Info Endpoint → 🟠 User Information Endpoint, under OIDC Configurations
- 🔵 Client ID → 🟠 Client Id, under OIDC Configurations
- 🔵 Client Secret → 🟠 Client Secret, under OIDC Configurations
- Type
openid emailin the Scopes field under the OIDC Configurations section.
No other configuration in 🟠 OneLogin for User Attributes and Third-Party Initiated Login Settings are required. The fields in these sections can be empty to continue.
- Confirm 🟠 OneLogin configuration by scrolling to the top of the page and clicking Save.
🔵 Beyond Identity console OneLogin authentication
The steps in this section involve going through the 🔵 Beyond Identity console again to configure the integration with OneLogin.
- Under the Redirect URIs section, click the + icon.
- Input
https://{YOUR_ONELOGIN_DOMAIN}.onelogin.com/access/idpinto the text field.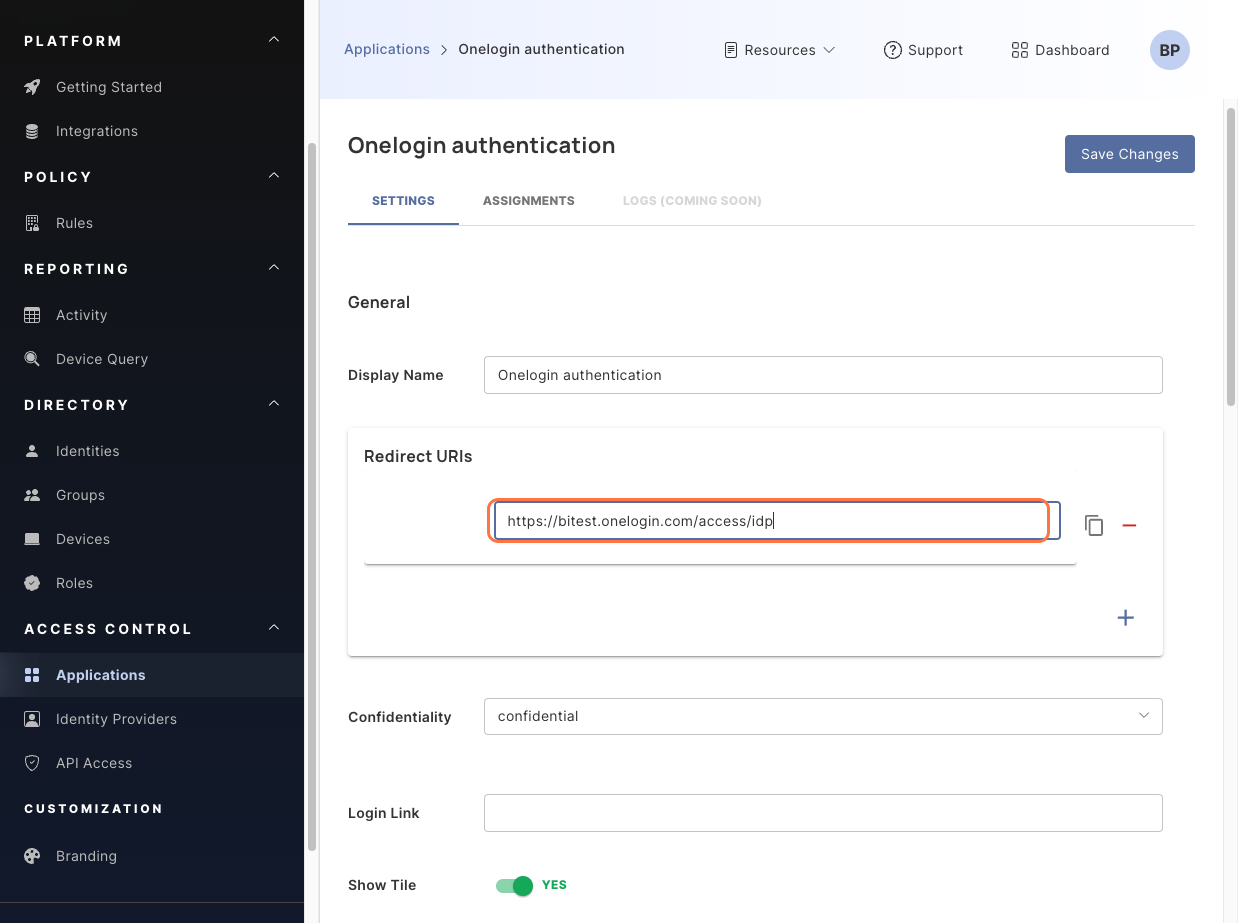
- In the General section, add the
https://{YOUR_ONELOGIN_DOMAIN}.onelogin.com/loginURL to the Login Link field. This shows the OneLogin tile for end users after logging into Beyond Identity. - Click the Save Changes button at the top. The pop up display shows the authentication successfully updated.
🔵 Beyond Identity SCIM setup
The Link below is for completing the SCIM implementation to bring OneLogin user information to Beyond Identity. Follow the steps for the Generic SCIM guide, then complete the section below for OneLogin. The following values are required for the OneLogin configuration.
- SCIM URL
- Bearer Token
🟠 OneLogin SCIM setup
The steps in this section cover going through OneLogin to configure the SCIM implementation for porting information to Beyond Identity.
- Navigate to Applications → Applications.
- Click Add App at the top right of the screen.
- Search for
SCIM Provisioner with SAML (SCIM v2 Core)and select the application. - Update the Display Name field to
Beyond Identity SCIM. - Click Save.
🟠 OneLogin SCIM configuration
The section below contains the information for configuring the SCIM app in OneLogin. Complete the steps in your OneLogin portal for the application from the OneLogin SCIM setup section.
- Navigate to the Applications → Applications dropdown at the top menu and select the
Beyond Identity SCIMapplication created from the previous section. - Navigate to the Configuration tab on the left.
- Input the following information into the API Connection section fields. The Beyond Identity values are from the Configure inbound provisioning section of the Generic SCIM application.
- SCIM Base URL → Beyond Identity SCIM URL
- SCIM Bearer Token → Bearer token from Beyond Identity
- SCIM JSON Template → paste the following JSON template
{
"schemas": [
  "urn:ietf:params:scim:schemas:core:2.0:User"
],
"userName": "{$parameters.scimusername}",
"displayName": "{$user.firstname} {$user.lastname}",
"name": {
  "givenName": "{$user.firstname}",
  "familyName": "{$user.lastname}"
},
"emails": [
  {
    "value": "{$user.email}",
    "primary": true,
    "type": "work"
  }
]
}
- Click the Enable button to begin the SCIM process.
🔵 Beyond Identity user assignment for OneLogin
This section is for assigning users to the OneLogin application from the Beyond Identity console.
- Click the Assignments tab at the top.
- Click the Add Assignments dropdown.
- Click By Identity.
- On the Assign Identities pop up, click the dropdown menu for Select Identities.
- Select the respective identity for the integration.
- Click Assign Identities.

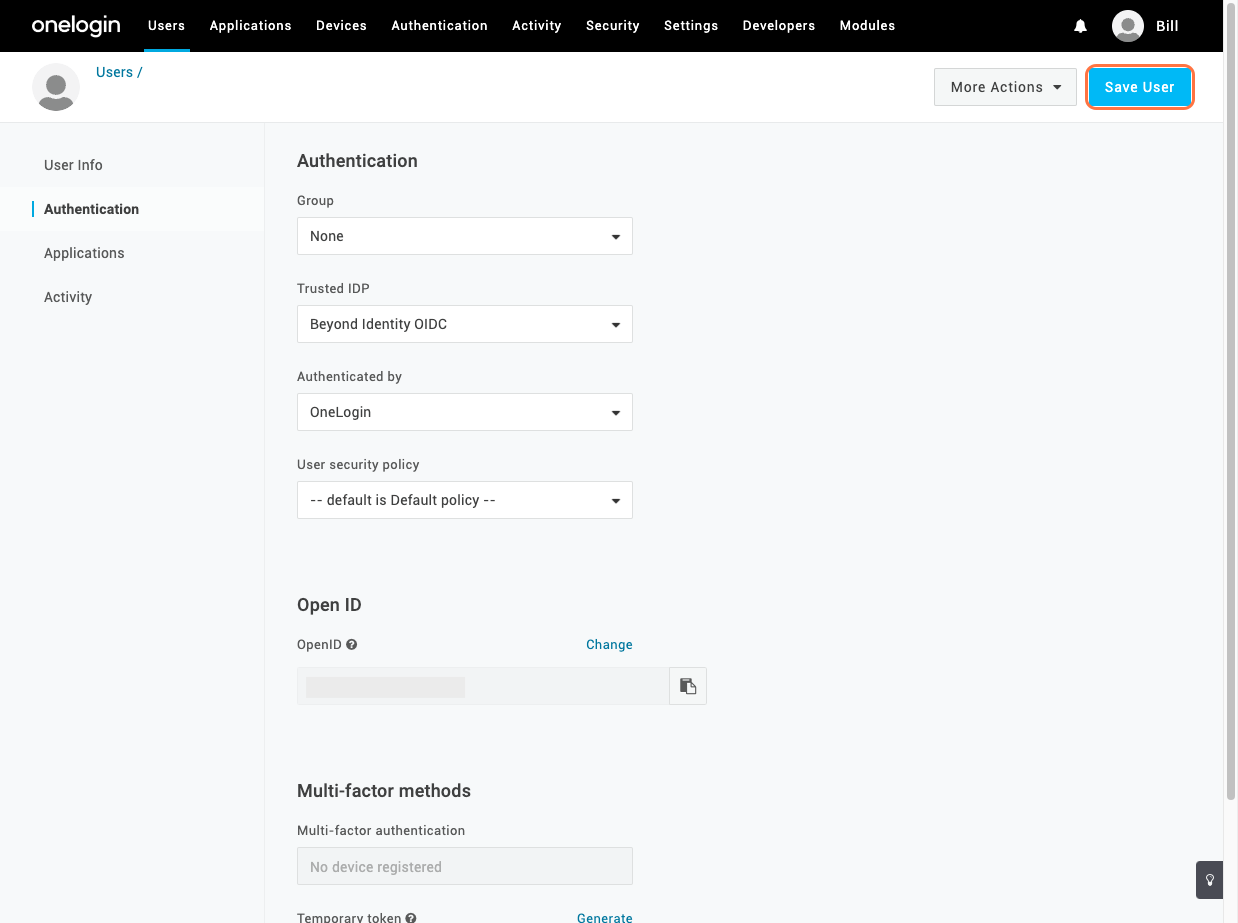
🟠 OneLogin user configuration
Before continuing with the next steps, complete the sections in the Generic SCIM guide for configuring users from the upstream directory source. This section covers the steps for configuring the user in your 🟠 OneLogin platform.
- Under the Users dropdown menu at the top, click Users.
- Click the respective user for the integration.
- On that user's page, click the Authentication tab on the left.
- Under the Trusted IDP section dropdown, select Beyond Identity OIDC.
- Click the Save User button on the top right.
- Under the Authentication dropdown menu at the top, click Trusted IdPs.
Congratulations! You've completed your Beyond Identity and OneLogin integration!