Policy
Create a policy
-
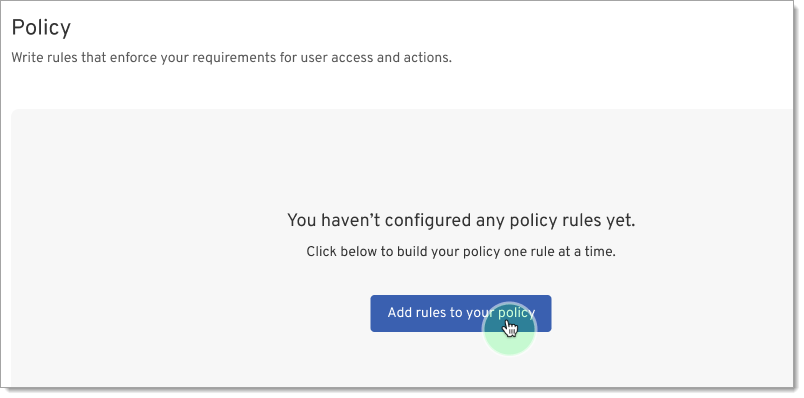
Click Policy under Tools.
-
Click Add rules to your policy to open the Policy Editor page.
-
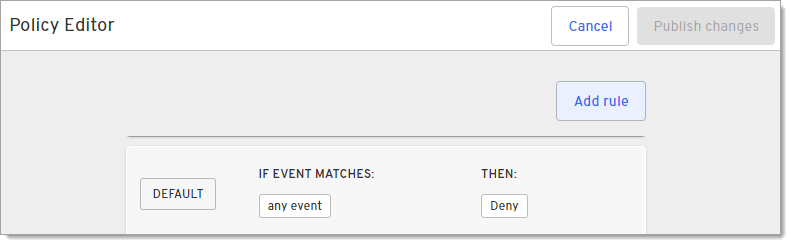
Click Add rule.
-
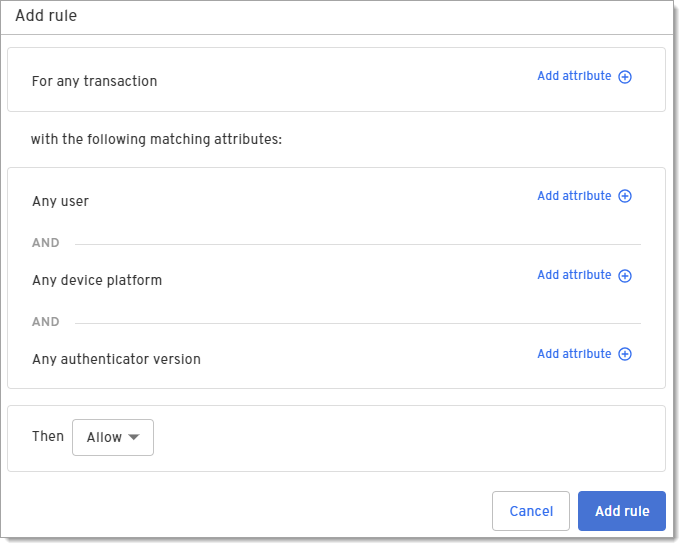
On the Add rule dialog, select Authentication as the transaction type under For any transaction.
-
Click Add attribute and select one or more attributes for this rule.
Type Platform Name Description Source Any user N/A has registered device(s) Checks how many devices a user has registered. For example if a user in the Accounting group has more than 5 registered devices, it could indicate a risk. Beyond Identity Cloud Any user N/A is in user group Checks whether a user is a member of a user group. Beyond Identity Cloud Any device platform N/A N/A Checks whether the OS on a device is supported by your organization. Beyond Identity Authenticator Any device platform Android Device Root is Checks whether a device has been rooted so you can deny authentication. Queries files and packages that would indicate a root. Any device platform Android Device has authentication Checks whether device authentication is required. If not, you may want to deny authentication because the device can connect to unsecure internet connections. Android KeyguardManager API Any device platform Android Authentication method enabled Checks the type of authentication on the device such as - Biometric
- PIN or Password
Android KeyguardManager API Any device platform Android API Level Checks the version of the framework API. The SDK version of the software currently running on the device. Any device platform ChromeOS with Android PA N/A Checks whether the device is a Chromebook using ChromeOS and the Android authenticator. Any device platform iOS Device jailbreak is Checks whether a device has been jailbroken so you can deny authentication. Checks for a jailbreak.txt file and whether the device can access cydia or the shell. Any device platform iOS Device has authentication Checks whether device authentication is required. If not, you may want to deny authentication because the device can connect to unsecure internet connections. Apple canEvaluatePolicy API Any device platform iOS Authentication method enabled Checks the type of authentication on the device such as - Biometric
- PIN
- PIN and Password
Apple canEvaluatePolicy API Any device platform iOS Version Checks the major and minor version of the device. Apple operatingSystemVersionString API Any device platform Linux Installed Security Software is Checks whether security software, such as CrowdStrike is installed on the device. Any device platform Linux Process running contains Checks whether the name of a process is running on the device. osquery Any device platform Linux Process running does not contain Checks to make sure a process is not running on the device. osquery Any device platform Linux System disks encrypted is Checks whether the disk is encrypted. Beyond Identity Authenticator Any device platform Linux File exists Checks whether a file you specify exists on the device. osquery Any device platform Linux OS version Checks the OS version on the device. osquery Any device platform Linux TPM version Checks whether the authenticating device does not have TEE (Trusted Execution Environment OR TPM/Secure Enclave). osquery Any device platform macOS Antivirus is Checks whether the authenticating device has antivirus disabled. Queries XProtect plist file Any device platform macOS Firewall is Checks whether the authenticating device has a disabled firewall. Queries firewall plist file Any device platform macOS Installed Security Software is Checks whether security software, such as CrowdStrike is installed on the device. Queries files for specific apps Any device platform macOS App installed contains Checks whether an app you specify has a specific version installed. This is useful for locating unsupported versions of apps in your environment. osquery Any device platform macOS File exists Checks whether a file you specify exists on the device. osquery Any device platform macOS Plist key value contains Checks whether the preference file contains a specific value for the: - Path
- Key
- Subkey
- Number or String
- Value
osquery Any device platform macOS Process running contrains Checks whether the name of a process is running on the device. osquery Any device platform macOS Process running does not contain Checks to make sure a process is not running on the device. osquery Any device platform macOS User FileVault is Checks whether the authenticating device has FileVault disabled. Queries FDE status Any device platform macOS OS version Checks the OS version on the device. Apple operatingSystemVersionString API Any device platform Web Authenticator Checks whether the connecting device is using a browser to authenticate. Any device platform Windows Antivirus is Checks whether the authenticating device has antivirus disabled. Microsoft Windows Security Center API Any device platform Windows Firewall is Checks whether the authenticating device has a disabled firewall. Microsoft Windows Security Center API Any device platform Windows Installed Security Software is Checks whether security software, such as CrowdStrike is installed on the device. Microsoft Windows Security Center API Any device platform Windows Domain Name contains Checks whether the device is on an approved Windows domain. Any device platform Windows File exists Checks whether a file you specify exists on the device. osquery Any device platform Windows Application installed contains Checks whether an app you specify has a specific version installed. This is useful for locating unsupported versions of apps in your environment. osquery Any device platform Windows Processing running contains Checks whether the name of a process is running on the device. osquery Any device platform Windows Process running does not contain Checks to make sure a process is not running on the device. osquery Any device platform Windows Registry Key exists Checks whether the name of a registry key exists. osquery Any device platform Windows Registry Key value Checks whether a specific value for a registry key exists. osquery Any device platform Windows Service installed contains Checks if Windows services are installed. osquery Any device platform Windows Service running contains Checks whether a specific Windows service is running. osquery Any device platform Windows System Disks Bitlocker is Checks whether BitLocker has been enabled on the device. Microsoft BitLocker API Any device platform Windows Version Checks the OS version on the device. Microsoft Environment AP Any integration CrowdStrike Falcon Zero Trust Assessment Score Checks the device's zero trust score. Crowdstrike Host API Any integration CrowdStrike Falcon Device found Checks whether CrowdStrike is able to collect data on the device. Crowdstrike Host API Any integration CrowdStrike Falcon Connection is Checks whether the device is connected to CrowdStrike. Crowdstrike Host API Any integration Cybereason Sensor found Checks whether the Cybereason Silent Sensor is available on the device. Cybereason API Any integration Cybereason Prevention status Checks whether Cybereason prevention is enabled or not installed. Cybereason API Any integration Intune Connection is Checks whether the device is connected to Intune. Microsoft Graph API Any integration Intune Registration Checks the device's registration status for Intune. Microsoft Graph API Any integration JAMF Connection is Checks whether the device is connected to JAMF. Jamf Pro API Any integration JAMF Managed state is Checks whether the device is managed by JAMF. Jamf Pro API Any integration JAMF Mobile Device Managed State is Checks whether the mobile device is managed by JAMF. Jamf Pro API Any integration Kandji API is Checks whether the Kandji API is available on the device. Kandji API Any integration Kandji Device is managed Checks whether the device is managed by Kandji. Kandji API Any integration SentinelOne Agent is active Checks whether the SentinelOne agent is in use. SentinelOne API Any integration SentinelOne Agent is decommissioned Checks whether the agent is in a decomissioned state while the device is under maintenance, the user is on vacation, etc. SentinelOne API Any integration SentinelOne Agent operational state Checks the status of the SentinelOne agent on the device. SentinelOne API Any integration SentinelOne Connection is Checks whether the device is connected to SentinelOne. SentinelOne API Any integration SentinelOne Device found Checks whether SentinelOne is able to collect data on the device. SentinelOne API Any integration Workspace one UEM Checks whether the device is connected to Workspace ONE. VMWare AirWatch API Any integration Workspace one UEM Checks whether the device is enrolled in Unified Endpoint Management (UEM). VMWare AirWatch API Any authenticator version N/A Authenticator version Checks the version of the Beyond Identity Authenticator installed on the device. Beyond Identity Authenticator -
Click whether to Allow or Deny this transaction based on the attributes in this rule.
-
Allow - Stops processing the rules if the criteria is met and will allow the transaction to complete.
-
Allow W/ OS Verification - Stops processing the rules if the criteria is met and will allow the transaction to complete once the user verifies their identity using their operating system.
-
Deny - Stop processing the rules. and will deny the transaction.
-
-
Click Add rule at the bottom of this dialog to add this rule to the policy.
-
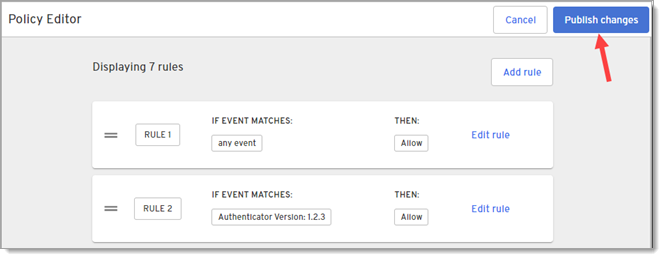
Repeat steps 3-7 to add more rules to this policy.
-
When finished adding rules, click Publish changes on the Policy Editor page.
-
When prompted, confirm that you want to publish changes.
-
If you have Device360, when you are returned to the Policy page, click Simulate to see how the rules would impact devices in your organization.
Use policy simulation to validate and test policies that will allow or restrict access to devices and apps before pushing them out to your fleet. This helps to ensure that deployments are successfully rolled out the first time without disruptions to users.
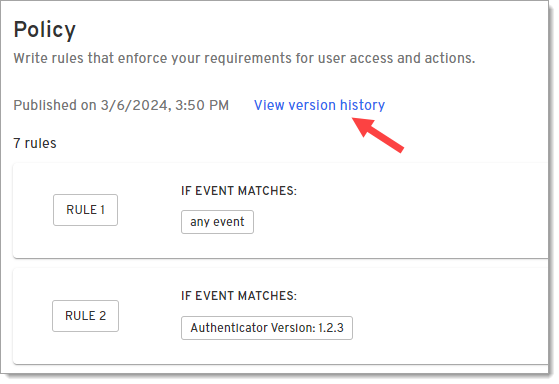
View version history
From the Policy page, you can view or revert to previous policy versions. This is helpful if you test a new policy and realize it will block a number of users so you want to revert to the last valid version of the policy.
-
On the Policy page, click View version history.
-
On the panel that pops out to the right, select a previous version of a policy.
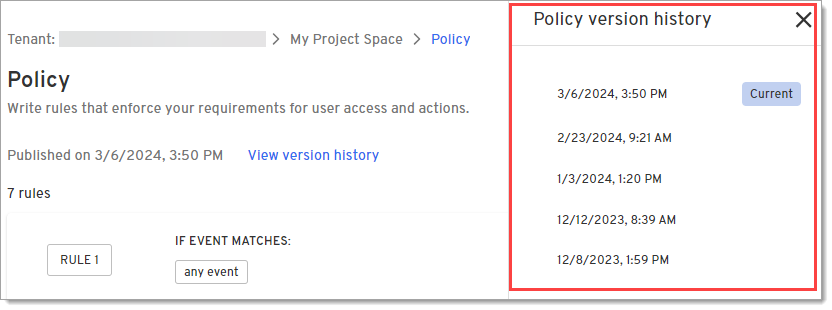
-
Review the previous policy.
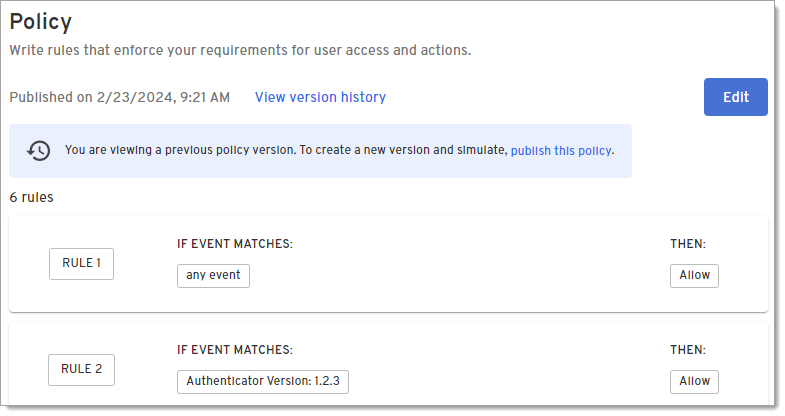
-
To revert to this policy, click the publish this policy link in the blue banner message that displays at the top of the page.
-
On the Policy Editor (restore version) page, click Restore Version.
-
When prompted, confirm that you want to publish the previous version.
